Creating the perfect social media photo is key to stirring up interest in a prospective client and inspiring your current customers. A great way to do this is by posting photos of the beautiful lash looks you create! Your ultimate goal with every social media post is to highlight the eyelash extensions in the best way possible by making sure that every social media photo is high quality, clear, and flattering.
In today’s feature, learn simple do’s and don’ts when it comes to creating the perfect social media photo. With the right picture and a consistent strategy, we’re confident that you’ll see results in your appointment calendar in no time.
For more inspiration from us and other Xtreme Lashes Lash Stylists, follow Xtreme Lashes on Instagram, Facebook, Pinterest and Twitter. Don’t forget: when sharing your lash looks on social media, use hashtag #xtremelashes and #lashista and tag @xtremelashes in your post so we can see your beautiful looks and feature your posts on our social media channels to give you more exposure!
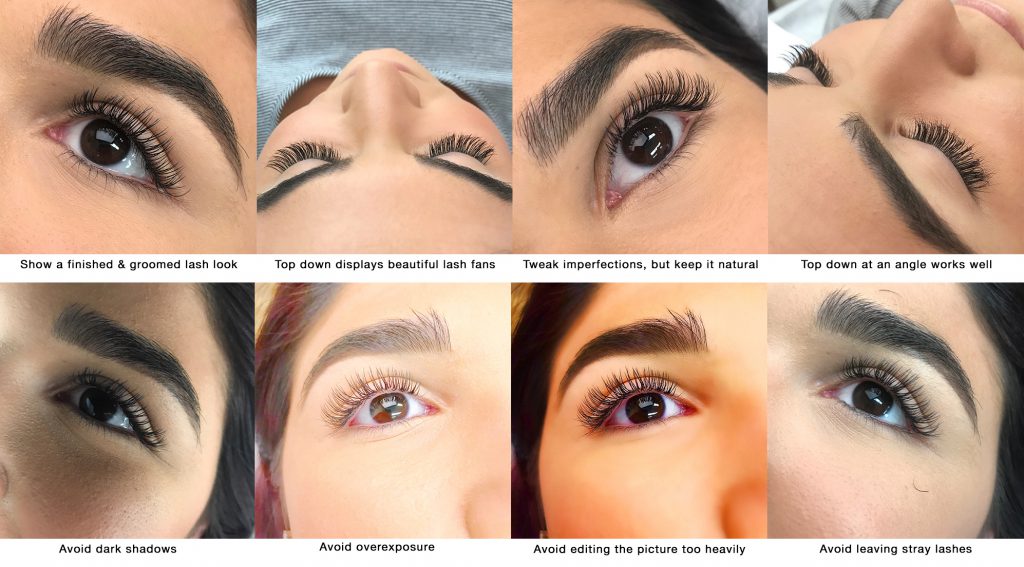
Below are some prime examples of what do to and what to avoid. To learn why, read more in our Social Media Photo Taking Tips.

Social Media Photo Taking Tips
1. Make the photo and eyelash extension application visually appealing
- Show finished lash looks. Before taking a picture, remove the under eye patches, tape and any stray lashes. This way, your photo truly focuses on the end result and the beautiful eyelash extensions.
- Groom the eyelash extensions into place with a Disposable Lash Styling Brush or a Lint-Free Applicator to fluff the lashes and make them nice and full.
- Groom the eyebrows into place with a Disposable Lash Styling Brush. When your client’s eyebrows are shown in the picture, make sure that they are nicely groomed and not distracting from the lashes.
- Use the Jo Mousselli® Skin Renewing™ Concealer to clean up under the brows and to brighten the under eyes. For hygienic reasons, do not apply the concealer straight from its applicator, but apply it onto a Flex Tip or Lint-Free Applicator first.
- Avoid posting irritated eyes. Sometimes your client’s eyes get a little red from keeping them closed for a longer period of time. In this case, it is probably best to take a picture of the lash look with your client’s eyes closed (see section Angles, angles, angles! for more inspiration).
- Avoid showing faded permanent cosmetics. If your client has faded eyebrow tattoos, offer to apply some Long Lasting Brow Pen to complete her look prior to photo-taking.
2. Good lighting makes a difference
- Use natural light when possible; nothing is more luminous and shows the lashes better than natural light.
- Don’t have easy access to natural light? A ring light or beauty light will help you ensure a properly lit photo.
- Avoid shadows in your picture. When taking a photo, check whether you see any shadows appearing from for example your phone or other elements in the room.
- Avoid making the eye area too bright. This can wash out the eyelash extensions in the picture and make the lash look appear to be sparse.
3. Angles, angles, angles!
- Be sure to make the eyelash extensions the focus in your picture.
- Try multiple angles to show the lashes from different sides and to get multiple options for your social media post.
- Choose a flattering angle and pose for your clients. Eye shapes and facial features are unique to each person. By trying different angles and poses, you can find what works best.
- A close up of the eye area showing the brow and eye only (open or closed) is always a great option.
4. Editing is good in moderation
- Editing your photo before posting can help enhance the beautiful elements and tweak any imperfections.
- If you do not have Photoshop, no problem! There are many editing apps available that make it very easy to edit your pictures straight from your phone. One of our favorites is the Facetune app.
- Keep it natural to showcase your lash work as true as possible. Don’t use too many filters or edit the picture to heavily.
- Square photos work best for Instagram. When you go to someone’s Instagram feed, you will see a preview of their pictures as a collection of squares. If you created a landscape (horizontal) or portrait (vertical) photo, Instagram will automatically show the photos cropped to a square on your feed. This may result in the best part of your picture being cut from the preview.
5. Content types & ideas
- Post different types of lash looks showcasing your ability to customize designs for each client. A great way to make a personal connection is to explain in your caption what look the client wanted to achieve or what her goal was. Your finished work is ultimately the solution to that!
- Share how important safety and hygiene are for the lash application process. A great example is to post a picture of your clean lash work station or disposable application supplies
- Try a Boomerang (an Instagram feature and app) of the eye opening and closing or of you brushing through the lashes!
- Share images of your decorated lash studio. Fellow Lash Stylists love to see it for inspiration, and clients will know what to expect when they come in.
- Use Instagram Stories. It’s a great way to get more exposure and show behind the scenes.
6. Use Hashtags in your social media photos and get seen by clients
- We encourage all Xtreme Lashes Lash Stylists to use the branded hashtags #xtremelashes and #lashista and tag @xtremelashes in the photo for a chance to be featured on our page. Also, add “Xtreme Lashes Lash Stylist” to your Instagram bio so we can easily recognize you and verify your account. Getting featured will give you exposure to many potential clients!
- As a starting point, we recommend using using a few larger hashtags, a few local hashtags, and a few smaller niche hashtags with every photo you post.
- Large hashtags: #lashextensions (3,887,900 posts) #eyelashextensions (4,250,000 posts) #lashstylist (491,000 posts) #lashstudio (97,000 posts)
- Local hashtags: #houstonlashes (94,000 posts) #houstonlashextensions (24,600 posts)
- Niche hashtags (most likely smaller) that relate to the photo: #xwraplashes (3,800 posts) #volumation (5,200 posts) #rainbowlashes (3,000 posts) #lashapplication (6,800 posts)